
Table of Contents
Introduction
If you’re unsure when and how to maintain your plate heat exchanger after installation, don’t worry—this guide will provide you with everything you need to know. Proper maintenance is essential not only to extend the life of your heat exchanger but also to minimize downtime and maintain optimal performance. By following the right plate heat exchanger maintenance practices, you’ll ensure reliable operation and reduce the risk of unexpected failures.
When Does Your Plate Heat Exchanger Need Servicing?
One of the major queries from all plate heat exchanger users is: What is the right frequency for plate heat exchanger servicing?
The answer is not simple—it depends on the heat exchanger application and the quality of the water.
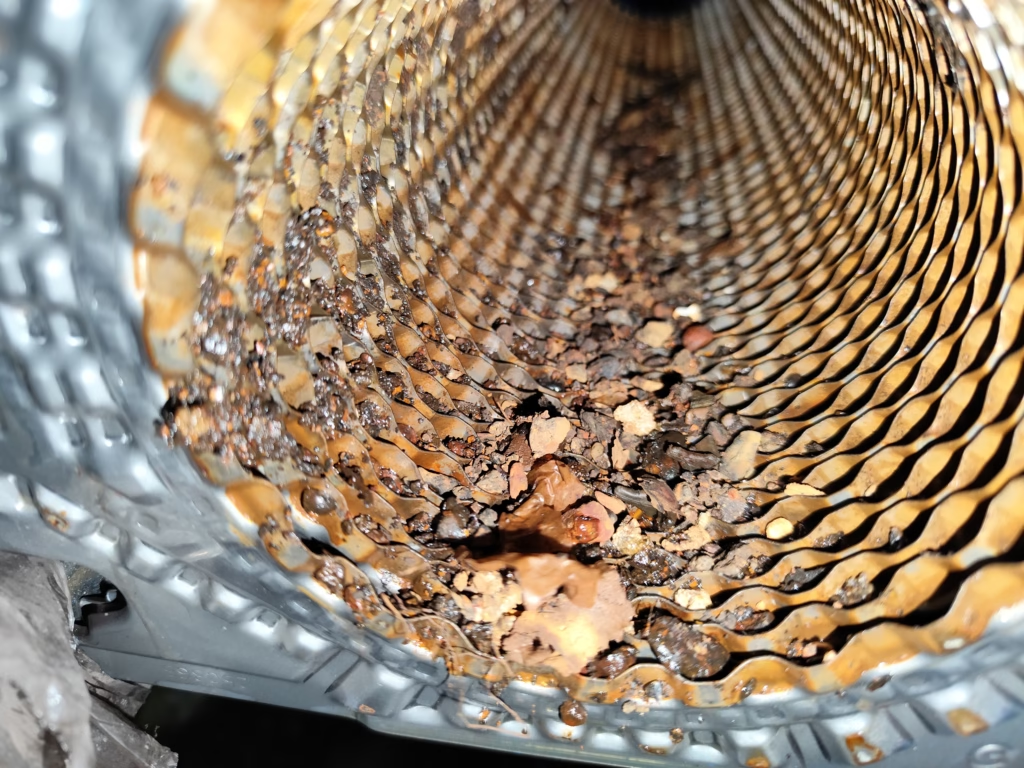
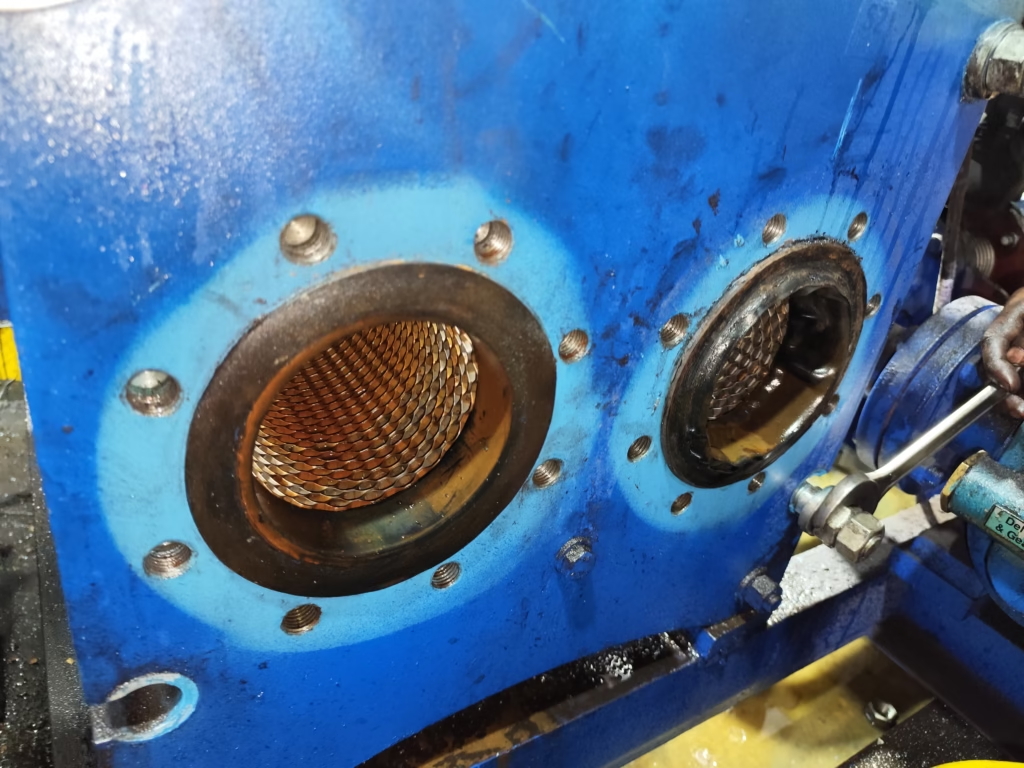
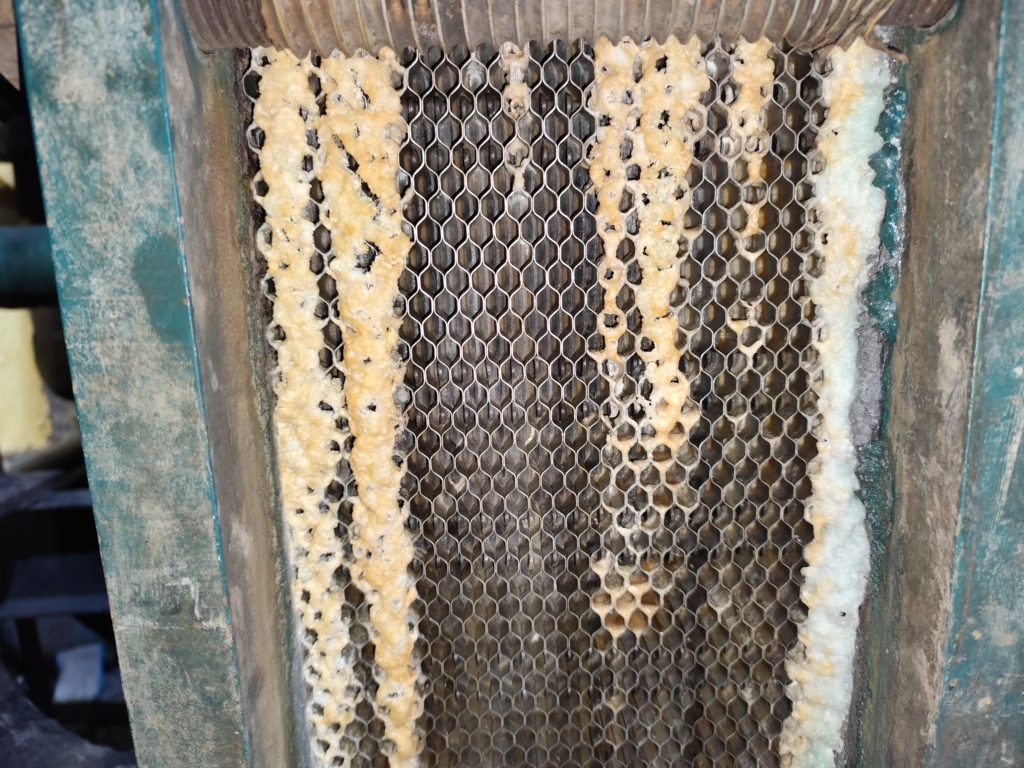
In some applications, the flowing media itself forms a layer on the heat transfer plates. In such cases, you will need very frequent servicing—sometimes once or twice a month.
In some applications, such as in the food industry, the flowing media is very clean and does not stick to the plates. In such cases, the servicing frequency is very low—only once every 5 to 6 years.
In general, if the quality of your cooling water is good, servicing the plate heat exchanger once a year is sufficient to maintain its efficiency and extend its lifespan. Regular annual maintenance also helps minimize the need for spare parts and unexpected repairs.
Routine Maintenance
here are two types of plate heat exchanger maintenance: CIP (Clean-In-Place) and manual cleaning.
1. CIP (Clean-In-Place):
CIP is a method where a cleaning machine is used to circulate a cleaning solution through the plate heat exchanger without dismantling it. This process gradually cleans the internal surfaces and typically takes between 30 minutes to 1.5 hours, depending on the size and condition of the heat exchanger.
However, CIP can only achieve about 60–70% cleanliness. While it helps reduce fouling and extend the time between full services, it does not restore the heat exchanger to 100% efficiency. CIP is best used as a maintenance step to minimize the frequency of manual servicing.
2. Manual Cleaning:
Manual cleaning for plate heat exchanger maintenance, involves fully dismantling the heat exchanger to physically inspect and clean each plate. This method is time-consuming but necessary when full restoration of heat transfer efficiency is required, especially when deposits are heavily built up or hard to remove with CIP.
Best Way to Maintain with a Plate Pack to Reduce Shutdown Time and Costs
The most cost-effective and time-efficient solution for servicing plate heat exchangers depends on the size of the heat exchanger and the cost of spare parts.
If your heat exchanger is small, the best approach is to use a standby unit. You can remove the existing unit and install the standby unit, which typically takes only about 30 minutes. After that, bring in a spare gasket set, service the removed unit, and prepare it for the next scheduled maintenance. During the next servicing, simply swap the units again—install the freshly serviced one and repeat the cycle.
This method significantly reduces downtime and overall maintenance costs while ensuring that your system continues to run efficiently.
If your heat exchanger is medium-sized, one effective solution is to use twin heat exchangers—two units mounted on a single platform. This setup allows you to switch from one exchanger to the other while the system is running, ensuring uninterrupted operation. When maintenance is needed, you can switch to the standby unit and service the offline one without any downtime.
Another efficient option is to keep a complete spare plate pack. In this method, you simply open the heat exchanger, replace the used plate pack with the spare one, and reassemble the unit. This process typically takes only a few hours. Once replaced, you can clean and service the removed plate pack and prepare it for the next maintenance cycle. This approach helps reduce both downtime and maintenance costs significantly.
If your heat exchanger is large, the most cost-effective solution is to plan a scheduled shutdown and carry out manual cleaning thoroughly. This ensures proper maintenance and helps maintain long-term efficiency and reliability.
Manual maintenance to plate heat exchangers step by step
How to shut down:
First, stop the flow of fluid on both sides and close the inlet valves. Keep the outlet valves open. Then, slowly open the air vent to safely release the internal pressure. Allow the liquid to drain by gravity.
Disassemble:
Disconnect all pipe connections from the heat exchanger. Lubricate the bolts to prevent damage, then begin loosening them slowly in a diagonal sequence. Remove all bolts following this method. After that, move the pressure plate toward the end of the frame; this will create a gap between the pressure plate and the heat transfer plates.
Removal of Plates from the Frame:
At the end position of the carrying bar and guiding bar, there is a designated opening that allows for plate removal. Move each heat transfer plate one by one toward the end of the frame, and carefully remove each plate by tilting it slightly.
Removal of Gaskets from Plates: If the gasket is a clip-on type, it can be easily removed by unclipping it from the plate. If it is a glued type, carefully remove the gaskets one by one by gently pulling them off. You may leave the remaining glue on the plate, or if you want you can remove it using a suitable solvent.
Inspection:
After removing the gaskets, inspect the condition of the plates. If the plates are in good condition with no visible damage, they can be reused. However, if any damage is found, a light test or dye penetrant test should be performed to check for cracks or defects. Additionally, if intermixing of fluids has been detected in the heat exchanger, a DP test is recommended to identify any leakage paths between the plates.
Chemical Suitability:
Depending on the type of fouling, you can use the following chemicals for plate cleaning: citric acid, nitric acid, phosphoric acid, or sulfamic acid. For heavier deposits, a 10% nitric acid solution can be effective. Additionally, sodium carbonate or sodium hydroxide may be used for alkaline cleaning. For oily or greasy deposits, kerosene, along with a soft brush, can help remove contaminants gently without damaging the plates.
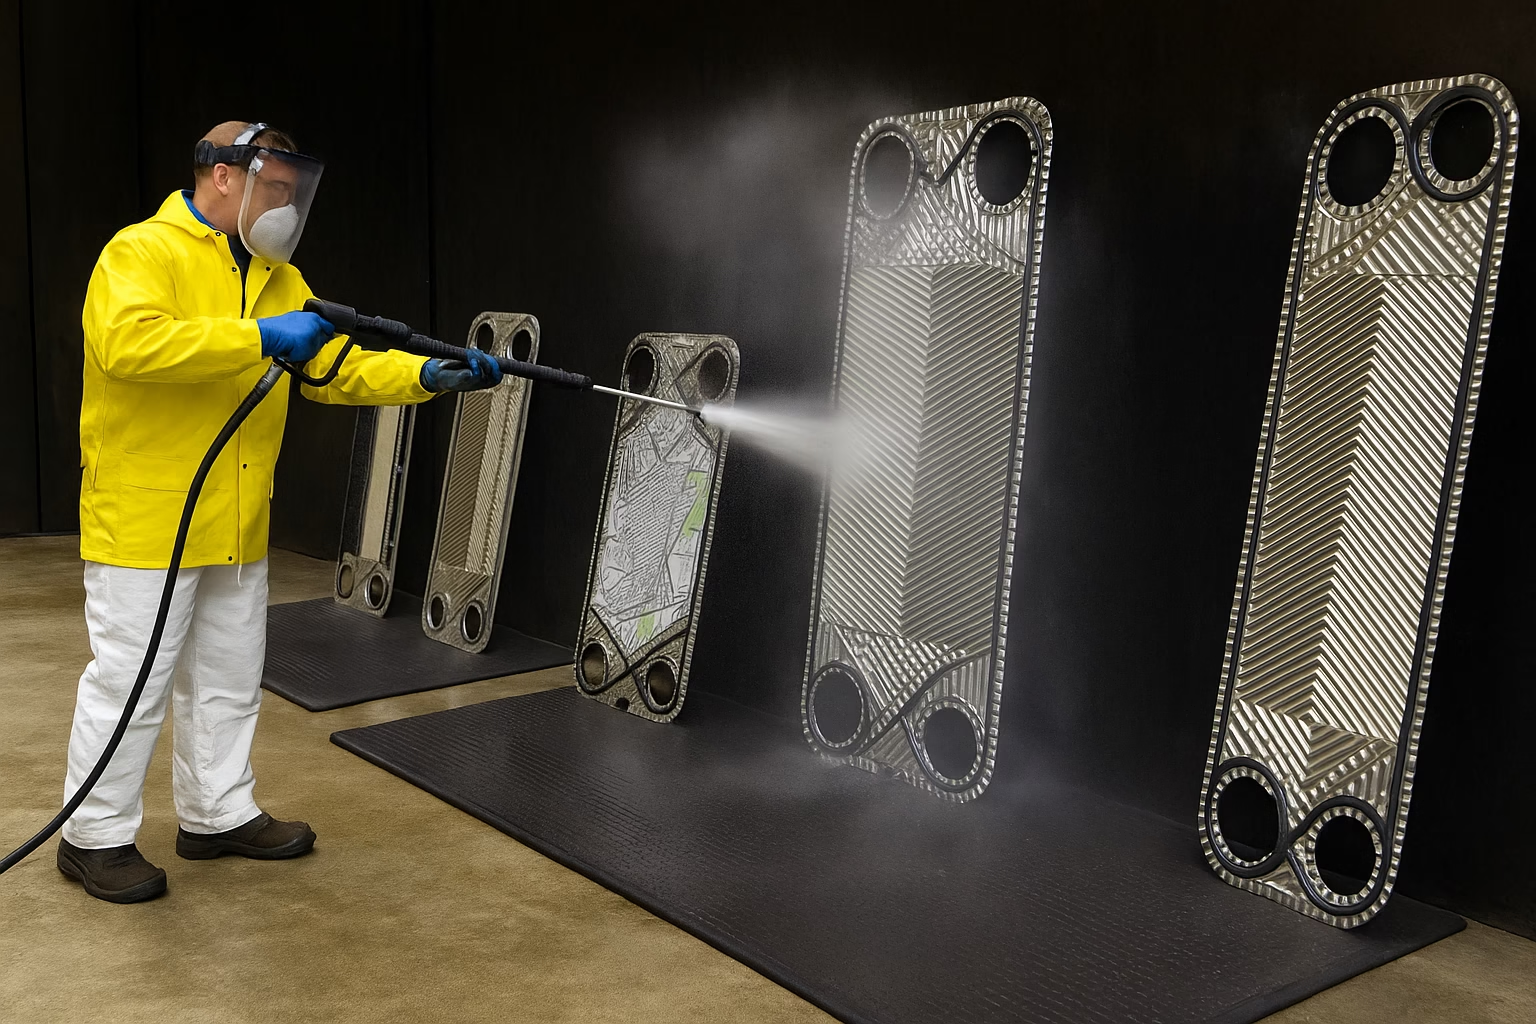
Plate Cleaning:
For plate heat exchanger maintenance, cleaning process may vary depending on the chemical used. Some chemicals can be used without heating—simply soak the plates for a few hours, then remove and clean them using a nylon brush and water. However, certain chemicals require heating during the soaking process to be effective. For guidance on chemical selection and the appropriate cleaning method, please contact our team.
Note:
1.Never use a wire brush to clean the plates, as it can damage the surface and potentially cause intermixing.
2.Avoid using phosphoric acid or sulfamic acid to clean titanium plates.
3.Do not use HCl or any water with a chloride content exceeding 300 PPM.
4.Always consult an expert regarding the appropriate acid concentration and temperature.
Plate Pinhole or Crack Check:
After cleaning and drying the plates, check for any pinholes or cracks. You can perform a light test or a dye penetrant (DP) test to detect them. If found any damage in plate than you need to replace the plate with new one.
Gasket Reassembly:
Now you need to prepare the plate pack. If the condition of the old gaskets is good, you can reuse them; otherwise, you need to replace all gaskets or only the damaged ones.
Start by placing the end plate on a clean table and applying the gasket as before.
If it is a glued gasket, apply the appropriate adhesive before attaching it.
Next, take a channel plate and place it properly on top, ensuring that the honeycomb structure aligns correctly from the side.
Apply the next gasket on this plate, making sure it is in the opposite direction to the previous one (as per the original sequence).
Continue placing plates and gaskets alternately, repeating the process until all plates are assembled.
Need to apply all closed start gasket on the start plate.
Note:
If using glued gaskets, allow the assembly to dry for 3–4 hours to ensure proper adhesion.
For more details about heat exchangers, please check the following link: Plate Heat Exchanger
Plate Assembly on Heat Exchanger:
Now, take each plate one by one from the top of the plate pack and hang them onto the plate heat exchanger in the correct sequence.
After all plates are mounted, bring the pressure plate forward toward the heat transfer plates as close as possible.
Tighten the bolts in the same manner and sequence as before.
Important:
Ensure that the overall plate pack length remains the same as it was originally.
Hydro Test:
After assembling the plate heat exchanger, a hydrostatic test must be performed to check for any leakage.
Pressurize the unit according to its design pressure and hold the pressure for 30 minutes to 1 hour.
If the unit holds the pressure without any drop, you can reconnect the pipelines and bring the system back online.
Alternative Method (if hydro test setup is not available):
Connect the hot side line and keep the cold side line open.
Start the flow on the hot side and let it run for 30 minutes to 1 hour.
If no liquid comes out from the cold side outlet, the system may be considered leak-free.
Note:
This alternative method is not 100% accurate, and a proper hydro test is strongly recommended for reliable verification.
Frequently Asked Questions
1. When should plates and gaskets be replaced?
Under standard operating conditions,Gaskets can typically last 3 to 5 years. Plates usually have a lifespan of 12 to 15 years. Lifespan may vary depending on operating environment and maintenance practices.
2. How can I extend the lifespan of a plate heat exchanger?
Perform preventive plate heat exchanger maintenance as recommended by the manufacturer.Keep cooling water as clean as possible to avoid fouling and scaling. Do not exceed the design temperature or pressure limits. Always seek help from qualified professionals for servicing.
3. What are common types of failure?
Intermixing of two fluids
Gasket failure
Side leakage
Leakage from the liner
Need Assistance?
Plate heat exchanger maintenance. Contact us for any support or services.